
Since I discovered Copics, I have spent a lot of time trying to compile information so that I could learn to really use these professional art markers to their fullest potential. I figured I would share all of the information I have come across in my travels with all of you in cyberland!
(Note- I am not copic certified. The information that follows is just my opinion and information I have found on the web and learned from classes.)
COPIC MARKERS- The Basics-
What are copics? Copic Markers are high quality alcohol ink markers, refillable , color consistent, non-toxic, acid-free when dry, and come in 358 colors. The ink is permanent but will not cross contaminate - or in other words, you will not ruin one marker by touching it's tip with another or coloring over another darker color. These alcohol-based dye markers make it possible to color over an image multiple times without making the paper pill. That is their super power which allows them to blend so beautifully. The result is smooth, even color-no more stripey unevenly colored images.
There are four types of Copic Markers-
Original (3)- square body, chisel tip and standard fine nib good for detail work, refillable
Ciao (4)- round body, brush nib and chisel tip, holds less ink than sketch and original, refillable
Sketch (2)- oval body, super brush nib and chisel tip, fits copic airbrush system (8), refillable
Wide - inch wide stroke, 36 colors, refillable (good for coloring large areas)
Sketch Markers are the most popular and are available in the most colors, 358.
Copic also makes a Multiliner SP fine-tip pen in 10 different tip sizes. The preferred tip size is the black 0.3 it is acid-free, archival safe, and most importantly won't bleed when you color over it with Copics. This is a must have for journaling, and touching-up stamped images.
Storage-
Copics can be stored upright or on their side (Spicas Glitter Pens need to be stored ontheir side or the glitter will clog). Here is how I store my copics. Aren't they beautiful!

Let's talk about the Colorless Blender Pen- You must have it! But the name is misleading...it is not so much a blender of ink as it is a pusher of ink. With the colorless blender, we expect blending, but it really does the following best: Lightens Color, Pushes color ,Great for Special Effects, Blends Colors when used with tip to tip blending method ,Fade to white by pushing colors. The colorless blender is your magic helper. If you have colored outside the lines of your stamped image, no worries, just use your colorless blender to push the ink back toward the line.
Color Coding System-
The Copic color coding system is made up of letters and numbers.
Letters- The letter(s) represents the color family.
R = Red
YR = Yellow-Red
Y = Yellow
YG = Yellow-Green
G = Green
BG = Blue-Green
B = Blue
BV = Blue-Violet
V = Violet
RV = Red-Violet
E = Earth
N = Neutral Gray
W = Warm Gray
C = Cool Gray
T = Toner Gray
The First Number - This represents the color saturation or intensity/gray scale. Lower numbers are more vibrant. Higher numbers are more gray.
The Second Number - This represents the color brightness. Lower numbers are light. Higher numbers are bright/dark.
Example- B00 will be light and bright blue where as B99 will be dark and gray blue.
This color coding system helps when picking which markers can be used together as a "natural blending group." Look for markers with the same letters and first number.
For example- R24, R27, R29 work great together.
When blending two markers, it generally works to pick ones that are two to four digits apart. So, B00, B02 and B05 would blend well. Some colors don't follow the rule (example- RV11 with RV14).
General Tips-
Since Copic markers can be a rather pricey initial investment, it is best to have a plan when selecting which color markers to get. UPDATED POST REGARDING CHOOSING COLORS CAN BE FOUND HERE !!!!
Copic Online lowest advertised price for markers is $5.24 sketch, $3.59 ciao, refills $5.99 MSRP retail price is $6.99 sketch , $4.79 ciao, $7.99 refills
Registered members of oozak.com or icopic.com receive a discounted price...membership has its privileges!
For beginners on a budget, I would advise not to get the basic pre-made sets as they usually do not provide multiple colors from blending families. To really get the most out of your Copics, you need to have 3 or 4 markers that can be used together in "natural blending groups" - various shades, light to dark, of the same color. *
The Copic Papercrafting sketch sets do offer some good color choices if you have a larger budget- specifically the Papercrafting set of 36, Papercrafting set of 72 and Papercrafting set 72B.*
If you can only afford to start out with 10, for example, just pick 3 sets of 3 markers in your usual go to colors along with a Colorless Blender Pen.
(Example- If you color mostly floral stamps- get 3 reds, 3 purples and 3 greens + your colorless blender).
***If you can’t make a large initial investment, try buying your markers in groups of 12. over time.*** Each month spend about $60-65. You may have to brown bag your lunch or give up your makeup or Starbucks habits like I did, but it is worth the sacrifice.
Period Style- is an online store that allows you to create a custom set of 12, 36, or 72 markers and it will come with a nice plastic case. This is great because you can get exactly what you need + they do free shipping for 12 + markers.
Suggested Colors to start with:
0- colorless blender, the Quad Zeros or triple zeros for blending (ie- Quad Zeros- R0000 B0000 BG0000 BV0000 V0000 YR0000 YG0000 RV0000 G0000 Y0000, E0000, C00, W00)
Also select flesh tones and hair colors if are you coloring people + and a little something from all the color families
The colors you choose should be complimentary with what kind of stamps you have and your personal color preferences.
Do you prefer Bights, Pastels, Basics, Earth tones?
I prefer bright and pastel colors (purple, aqua, teal and pink are my favorite colors) and I color mostly people and some flowers….
Colors I use often:
E0000, BV000, RV000, BG000, B000
Earth- E000, E00, E11, E13, E21, E25, E27, E29, E31, E33, E35, E37 , E49, plus Y21, R20 (Flesh/Hair colors)
Red - R29 R35 R37 (red) R81 R83 R85 (pink)
Orange -YR61 YR65 YR68 (orange)
Yellow -Y11 Y13 Y15 (light bright yellow) Y32 Y35 Y38 (sunflower)
Yellow Green- YG03 YG13 YG17 (bright green) YG91 YG93 YG97 (olive)
Green - G21 G24 G28 (green)
Blue Green- BG72 BG75 BG78 (deep water) BG10 BG11 BG13 (aqua)
Blue- B12 B14 B16 (sky blue) B91 B95 B97 (jeans)
Blue Violet- BV02 BV13 BV17 (amethyst)
Violet- V12 V15 V17 (bright purple) V91 V93 V95 (pale purple)
Red Violet- RV10 RV23 RV32 (pink)
Cool Gray C1 C3 C5 C9 (black)
Note- These 72 markers would cost you at least $377.28 if you bought them at the $5.24 price. Hefty Investment! But well worth the price overtime. I no longer use pencils, watercolor crayons, water based markers, etc. These markers will last a lifetime if treated right because you can just keep refilling them and replacing the tips.
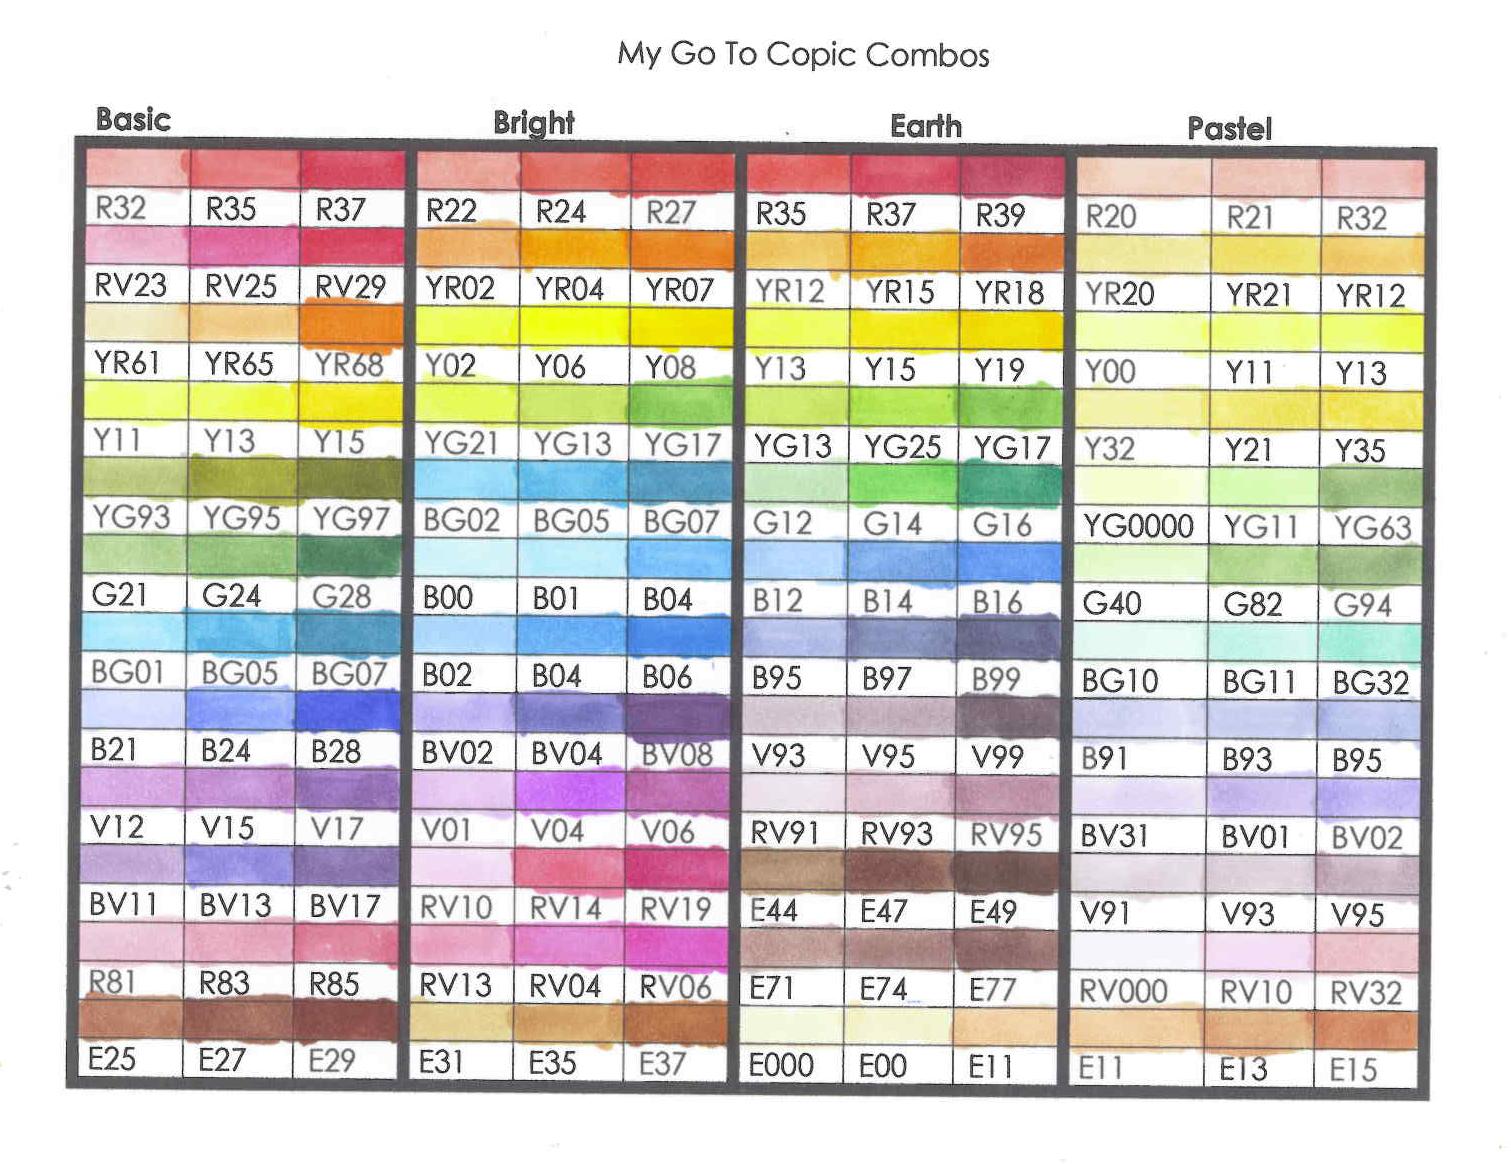
edited 4/18/12- Here is a link to some posts I have done sharing my favorite copic color combinations and my Copic Journal.
Examples of Color Combos:

Other Accessories needed for Copic success:
The Right Ink-
Using copic compatible ink is crucial as all others will bleed, smear and potentially ruin the tips of your markers.
My ink of choice is Memento Tuxedo Black ink which comes in pads, markers, and dew drop size.
Other inks that can work with Copics according to a copic certified instructor- Amuse, Ranger Soot Black Distress Ink (all dry quickly)
Brilliance and Memories and Versafine ink (MUST BE HEAT SET)
Non-Compatible:
Stazon, Stampin Up, Close to my Heart, Inks made for waterbased markers, colored embossing powders
The Right Paper-
You should use a smooth, heavy , non- coated paper when coloring with copics for optimal blending.
Make sure to always test your paper. These markers work differently on each style of paper. Some things your want to be aware of are bleeding and feathering of the markers. It is okay if the paper bleeds the ink through the back (you want to see a well blended image on the back of your work...this means you are blending evenly. Make sure to have a scratch piece of paper behind your work. Watch out for papers that lead to ink feathering, this is when the ink spreads outward on the paper.
The new X-Press It Blending Card (cardstock) from Australia is very highly recommended by the Copic certified instructors as being extremely easy to blend with. (icopic.com, papermaniac.com, 7kidscollegefund.com)
My favorites cardstocks are:
1- COPIC X-Press It Blending Card 92 lb super smooth cardstock from Australia (available at oozak, allthatscraps, papermaniac, diecutsrus, icopic)
2- Boise HD Color Copy Cover 80lb (tigerdirect.com)
3- PTI Stampers Select White (from Papertreyink.com)
4- C.C. Designs copic quality paper (allthatscraps.com)
5-Neenah Classic Crest Solar White 80 lb or 120 lb (XPedX stores or online at places such as papermaniac.com, creativeplaystamps.com, stampandcreate.com, diecutsrus.com)
For me -these 5 papers were the easiest to blend with and I do not experience the dreaded ink feathering outside the stamped lines issue.
Some people also recommend Gina K Pure Luxury120 llb , Cryogen Irridescent White and Georgia Pacific 110 llb. (I have not tried Gina K or Cryogen cardstock). I have a ream of Georgia Pacific and I don’t care for the grainy quality/ rough tooth and off white/grayish color. That being said, it is cheap and you can get it at Walmart, so it is great for practice coloring if you are just starting out.
It is important to test your paper and ink combination as results can vary depending on what ink you use to stamp your images and what paper you are stamping on. Here is a link to a post that describes how to test your paper.
* A Note on Digi Stamping-
Copic Marker inks will not destroy lines printed out from a laser printer or standard photocopier. This is because they are toner-based devices and the toner is fused to the paper so the alcohol ink from the markers will not destroy it. However, with inkjet printers, each printer uses slightly different inks and you need to test your printouts before you color or you could make a mess. Newer inkjet printers seem to work better than the old; but to be safe you should always test them out. Some inkjet printed images will smear when the alcohol ink is colored over them. (*like with my printer Epson RX580 :0( If I color very carefully and do not color over the lines I can use my printed images.)
edited 10/21/10- I have found that if I set my printing preferences to Draft and select Semi Glossy Paper as the paper type that less ink is printed out and I therefore do not experiencing bleeding/smearing.
edited 4/18/12- I got the HP Envy All In One Printer and I have smearing problems with my digi images if printed with regular printing properties. I find that I need to select fast draft printing on regular paper so that less ink is printed on the page to prevent smearing.
Techniques-
There are many different ways to blend with copics, tip to tip blending, light to dark, dark to light, feathering....the list goes on and on. There are tons of fabulous video tutorials you can watch online if you are a visual learner. Here are two suggested techniques from the copic official site:
Marker Blending on Paper
1. Color evenly, really soaking the paper. Color in circles to keep you edges wet and to avoid streaks.
2. While it is still wet, add your darker color to one side. Lift up at the end of the stroke, so you have more ink on the shadow side and less on the edge where it will be blending. You can do this step after your base color has dried, it is easier however to do it while the base is wet.
3. Go back over the darker color with your first color. Add a lot of ink and really soak it in. This is what hides those rough edges and mixes the two colors together to get a smooth blend. If this doesn’t work for you, try using colors that are closer in value to each other, or use lighter colors to begin with. Repeat steps 2 and 3, layering more and more ink until it gets as smooth as you want it. You won’t destroy your paper, don’t worry.
4. Add a third color if you wish, again, using the same technique. Start with your lightest, add your middle color, go back with your lightest to blend those two layers together, then add your darkest, then go back with your middle to blend the dark into the rest of the picture. Finish up by using your lightest color.
5. Use the colorless blender to add a highlight back in. For a stronger highlight, use Opaque White and paint a white spot back in.
Marker to Marker Blending
This works with any two Copic markers. If you want the color area to fade to white, use a blender pen as one of your colors. If you wanted it to fade to yellow, then choose a yellow as your “brush” color.
1. Always use the lighter color to pick up darker colors, that way you can see how much color you’re picking up.
2. Use the colorless blender as a paintbrush and pick up some of the color from your other marker, directly onto your blender pen.
3. Start with small dabs of color until you see how much/how quickly it will fade out when used.
4. Next, choose a picture that you want to color, and touch your marker at the darkest point you want. Then color out towards the lighter side.
*If you’re done blending with that color but your marker tip still looks dirty, just scribble onto some scratch paper until the color comes completely off.
Great Resources on the web:
Here is a link to the copic hand color chart. You can print it out and color in which markers you have then refer to it when you are shopping to make sure you don't purchase duplicates.
Copic FAQ thread on Splitcoast Stampers site.
Copic's website.
Copic Color is a new site that Copic has launched that is like a cross between facebook- an online gallery- and a tool to track what markers you own vs. which ones you would like to own. It is mobile compatible!
Ilikemarkers.blogspot.com Marianne Walker is the copic guru and offers wonderful instruction on her blog regarding color theory, shading, and all the latest greatest copic info.
Lime Tart has a great archive of their Marker Monday blog posts featuring tips and techniques.
Youtube.com- search for copic coloring, or Suzanne J Dean- she has great tutorials- check out her vid on Scandinavian style coloring. Makeupartistkatie also has some great vids including how to color cone shaped, cylinders, cube shaped objects, and my favorite- high contrast coloring.
Suzanne Dean just started offering online Copic classes through her Color Me Creative Online Classroom. You can see the details here. She has a beginner, intermediate, advanced, and fun level class. I can't wait to take them. If you sign up, please mention in an email that I referred you.
Mycreativeclassroom.com – they offer a great online copic class called Everything Copic taught by Copic design team member Colleen Schaan. I was inept with my copic coloring before I took this class. It was very helpful.
http://www.oozak.com/ best online prices for copics and refills for registered users (must register to see the lowest price)
Period Style- copicmarkers.com - you can create a custom color set of markers 12, 36, or 72 and it will come in a clear plastic case. Great for when you are starting out. Free shipping on 12+ markers.
Final Points-
It is a good idea to do some research and check out other stampers’ blogs and see what colors they are using to color their images. If you like what you see, take note of the color combinations that they are using and then invest in those copics.
I keep all of my favorites in my portable copic journal so I can see what the combos look like together. You can view a post with sample pictures from my journal here.
Here is a link to Rachel's blog. She is the creator of the journal pages.
In my blog roll of copic friendly blogs on my sidebar, most or all of these bloggers post what colors they are using. Especially Color Me Copic -this blog is hosted by a collection of great ladies who all use copics in their projects and they list all of their favorite color combinations, suggested starter colors and they even will answer questions that you email to them.
The most important thing to remember is: practice, practice, practice! Rome wasn't built in a day…Copics have a learning curve. Practice, be patient, and don’t give up! Once you master your basic coloring skills- blend blend blend and remember where your light source is and you will have fabulously colored images in no time.
