Hey Y'all! Yes I am a northerner who says Y'all...love that word.
Quick post with some color suggestions for Cobby on Splitcoast, she is looking for Copic colors to use with Copic G12 Sea Green.
I use this peculiar color(it stands alone on the copic color wheel) for my grass green combo.
Either G12 G14 G16 or G12 G05 G09. I got the first combo from the first online Copic class I took at My Creative Classroom. The instructor is a great lady named Colleen Schaan. The second combo I just came upon while messing around with my markers. G12 is a weird color like I said. Most light colors seem to repel darker ink and I swear G12 soaks into the darker colors. It doesn't get that weird grayish cast that other light colors get when you use them over dark colors.
Anyway, that is my two cents for the day!
Tuesday, June 29, 2010
Copic Hair Colors Part 2
Happy Tuesday! Having a bit of a rough start here today. I missed the bus by about a minute which ended up getting me to work an hour late. Gotta love commuting! Anyway, as promised here is part 2 of my Copic hair coloring practice sheet. Hope you find this useful. FYI- the bottom row is blank because I don't have E79 and YR09 yet.
Monday, June 28, 2010
Fin-Tabulous!
Yay! I finally figured out how to post pictures using my old computer. My new computer is broken so I can't do my normal routine: take pic, insert media card in netbook, edit pic, post pic...etc. I had to go old school and stick the usb cable in the camera and hook it to my old dinosaur computer. Biggest problem with that is no Photoshop...so the pics are a bit rough.
I have had this image colored for a few weeks now, but didn't have any patterned paper to go with her. So I finally decided to just make my own. I had a ton of fun making this background. I sponged all kinds of colors together and then sprayed the whole thing with glimmer mist. Once it dried it had that spattery- watery look I was going for. Hope you like it!
Recipe: Pearl Tidepool and Seymoore stamps by Sweet November Stamps and Summer Sentiments by Amy R, SU! Bermuda Bay cardstock, PTI Hawaiian Shores Aqua Mist and Stampers Select White Cardstock, Die Cuts With A View Glitter Cardstock, Martha Stewart Daisy Punch around the Page punches, Texture Bobbin Ribbon, Jazz Blue Tattered Angels Glimmer Mist, Memento Tuxedo Black Bahama Blue Pear Tart Grape Jelly Cottage Ivy and Desert Sand ink, clear dollar stamps, Diamond Stickles, Copics: B000, B01, BG45, BG49, Y00, RV42, E000, E00, E93, E95, E21, R00, E70, E71, E74, E77, YG91, YG93, YG95
Thursday, June 24, 2010
Recipe: Lemon Greek Chicken
Happy Thursday! I was hopping around today on the Unity hop and found a great looking recipe for Lemon Greek Chicken over on Brooke's blog. Lemon...anything always sounds good to me. I think this looks like something I can't screw up.
2 tsp. lemon zest
1/4 c lemon juice
2 T olive oil
4 lg garlic cloves, pressed
2-3 tsp dried oregano
3/4 tsp salt
1/8 tsp ground black pepper
2-3 med baking potatoes- no need to peel
1 med red bell pepper, cut into 1 inch pieces
1 med red onion, cut into wedges
8 oz fresh whole mushrooms
4 boneless skinless chicken breasts
Preheat oven to 400
Combine zest, juice and oil.
Add pressed garlic, oregano, salt and pepper. Set aside.
Cut potatoes into lenthwise wedges.
Place in 9X13 stone baker or other 9x13 pan.
Add bell pepper, onion, mushrooms and half of lemon juice mixture.
Toss to coat.
Place chicken on top of vegetables;
brush with remaining lemon juice mixture.
{or if you are ME.. dump everything into a huge bowl
with all the lemon mixture and coat it all at once}
Bake 1 hour or until chicken is no longer pink.
Brush chicken and vegetables with pan juices after 30 min.
Yield: approx 4 servings.
Wednesday, June 23, 2010
Quick update...and trimmer review
Just dropping in to say hello! To say the beginning of this week has been hectic would be an understatement. I am working on several different projects...all of which are in progress and not very near completion...think lots of colored images and no completed cards...lol. I am also doing another installment of the copic hair color sheet...this one has more blondes and reds. Hopefully I will be back by then end of this week with a project or two to share.
Product Review for you:
I know we all have probably had a love hate relationship with our paper trimmers...ie- we either love the thing but wish we could change a few things about it or we hate the thing and want to throw it in the trash! Well I can finally say I found one that I love... the Fiskars Rock Paper Trimmer. I was skeptical at first... I mean why would I buy a paper trimmer with speakers for a mp3 player or cd player...it just seemed silly to me the first time I saw it. However, I was reading up on Splitcoast a few weeks back and saw rave reviews for it. Different people were saying it was their favorite trimmer. I had done an ebay search for it to see if I could get it affordably but couldn't find one for sale at the time. Well last week I read yet another great review for it and decided to search for it again and...JACKPOT... I found the teal version(no cute butterflies) brand new on amazon for $34 including shipping. Now since the retail price of the trimmer is $99... I considered this a great price. Only a few bucks more than any other trimmer I have ever bought... certainly cheaper then the last CARL trimmer I got at Staples... So I patiently waited for it to arrive and it came just before the weekend. My first thought was...darn I didn't expect it to be this large. It is pretty big...not really a trimmer to take with you to crops and playdates...but WOW does this thing work. Pre-labeled measurements...it is light, can cut 12 X 12 and the speakers actually produce great sound quality. I actually sometimes want to listen to my iPod when I am stamping but never do because I am already using all my outlets in my room...now I can just pop the iPod into the little cradle on the trimmer and jam away while I work on my projects. I really do love this new trimmer. I can even cut small paper sizes under two inches ...which was my only real problem with my CARL. So if you are in the market to try a new trimmer, I definitely recommend the Rock Paper Trimmer or its speaker-less counterpart (assuming you can get a good price!) ;0)
Hugs,
Sunday, June 20, 2010
Friday, June 18, 2010
More Copic Journal Pages
TGIF! Happy Friday to everyone! YAY! The work week is coming to a close and the weekend is about to begin... I am looking forward to warm weather, sunshine and BBQing with my Dad for Father's Day!
I have some copic journal pages to share with you today.
First I have some Eye Color examples for you. This is based on the Tuesday Tutorial over on the Whimsie Doodles Blog. If you missed it you can check it out here and download the practice sheet full of eyes. Next is a redo of my go to Copic Color Combos...this one is completely filled in for you.
Finally here is clean copy of a copic jornal page with some color combos I was playing around with.
Wednesday, June 16, 2010
Happy Birthday EBay
Happy Wednesday! Today is my friend Erin's birthday. Here is a quick card I made for her. I made a red velvet cake for her too ...with lots of candles for the cake ;0)
Recipe: Happy Bugg digi set by Tiddly Inks, PTI Pink Shimmer Cardstock, PTI Stampers Select White Cardstock, PTI patterned paper, SU! River Rock cardstock, May Arts Ribbon, Boweasy, SU! Wide Oval Punch, circle punch, Nesties Labels One, Diamond Stickles, Copics: B60 BV20, R00, E93, E11, E13, E15, E000, BV02 BV01, BV31, E44, E47, E49, BG0000, BG000, RV00, RV02, RV21,
Tuesday, June 15, 2010
Playing Dress Up
When I saw this little digi... I immediately thought of me as a kid playing in my parents' closet and dressing up in my dad's clothes. I was definitely a Daddy's Girl! I thought this would make a perfect father's day card.
The Post It Paper didn't take the Distress Ink as well as I would like... I think I need to try a quicker drying formula for this paper. But it was great to not have to apply any adhesive to those layers. Makes making a quick card...very simple.
Monday, June 14, 2010
Spider Dad, Super Dad
Happy Monday! I had so much fun playing with this great digi from Whiff of Joy called Spider Henry. Katharina had it on her blog a few weeks back as a freebie and I wasn't sure what I would do with it. But then I found dome ATD Super Hero Specialty Papers on clearance at M's and an idea was born. I hope my Dad likes it...he likes Spiderman...so the chances are good.
Recipe: free Whiff of Joy Spider Henry digi by Alison Acton,
ATD Super Hero Specialty Paper, Coredinations cardstock, Copics: C3, C1, C00, R83, RV32, R20, E53, E51, E50, R39, R37, R35, B21, B14, B16
Sunday, June 13, 2010
Happy Summer
It is very very hot here today. I am beating the heat by making some cards. Here is another great digi image from Spesch Designer Stamps. He is so summery. I can just picture him surfing on Bondi beach. Although I guess technically it is currently winter down under. I was playing around trying to come up with some summery color combos, and here is what I came up with.
I added this cute hot dog in his hand to go with the BBQ theme.Recipe: Cool Dude Digi by Spesch Designer Stamps, Studio G clear stamps VS4911 Series 14, Amy R Summer Sentiments stamp, PTI Cardstock, Neenah Solar White Cardstock, CC Designs Copic Quality Cardstock, Tim Holtz Alterations Scrollwork On the Edge Die, Me and My Big Ideas Soft Spoken DP- Relax stickers, Modge Podge Gloss Lustre, Memento Tuxedo Black Ink, Diamond Stickles, Copics: pictured above and YR24 E23 E55 E53 E51 R35 R22 B45 C5 C7 C9
Saturday, June 12, 2010
Summer time is near
Happy Saturday! I made a fun summer time card with this great new digi stamp from Spesch stamps. I just love her cute face...I colored her a bit sunburn...because that was what her expression reminded me of.
Recipe: digi stamp by Spesch stamps, SU Phrase Starters II, Neenah Solar White Cardstock, PTI and SU Cardstocks, Making Memories pattern paper, Mt Deco Washi tape, Tim Holtz Alterations On The Edge die, Me and My Big Ideas sticker, Memento Rose Bud ink, Diamond Stickles, Copics: R30 R22 R46 YG03 YG06 YG00 BGOOO BG72 BG10 BG11 BG15 BG18 Y21 Y15 Y19 Y21 Y23 Y35 Y38BG01 BG05 R00 E93
Friday, June 11, 2010
TGIF and Copic Skin and Hair tones
Thank God it is finally friday. The work week is over and I have a full weekend of relaxation to look forward to. I was wondering if I would make it through the week...but I did and now I am spending some well deserved me time playing with my copics. I have a ton of videos to watch from the Color Me Creative Classroom...I am way behind and I enrolled in a second class which I haven't even started. So to kick off my weekend I decided to play around a little with hair and skin tone combos. I was inspired by the great post over on the Color Me Copic blog with the gals' favorite skin tone combos.
Digi image: Katrina by Tiddly Inks (edited to just show her face and hair)
*colored on regular copy paper as my good quality cardstock wouldn't go through the laser jet printer at work (boo!)
Thursday, June 10, 2010
Recipe: Liege Waffles
I was at the Seaport and came upon a waffle cart... called Waffles and Dinges. They had all sorts of options for different types of waffles and the one I chose was the Liege Waffle. Originated in Belgium in the city of Liege, this waffle is sweeter and denser than traditional Belgium Waffles(think chewy rather than crispy).
Man was that the best Waffle I ever had!!! The topping- Speculoos (Biscoff spread) has a nutella consitency but tastes like graham crackers. (Biscoff can be ordered from their website and costs $14.40 for 2 28oz jars). I think I will try eating these in the future with Nutella at $2.79 a jar...lol!
I want to see if I can make these babies for myself so I found this recipe to try.
Liege Waffle Recipe
1 (1/4 ounce) package yeast
1/3 cup lukewarm water (about 105 degF - too hot will kill the yeast)
1 1/2 tablespoons granulated white sugar
1/8 teaspoon salt
2 cups flour
3 eggs
1 cup melted butter
1 teaspoon vanilla extract
3/4 teaspoon ground cinnamon (optional)
1 cup pearl sugar*
Mix the yeast, water, sugar and salt in a bowl and let it develop or sit for 15 minutes.
Place the flour in a separate large mixing bowl (we use the bowl of our kitchen aid stand mixer) and make a well in the center of the flour.
Pour the yeast mixture into the well and mix until blended on medium speed (we use the paddle in our kitchen aid mixer).
Add the eggs (one at a time), melted butter a bit at a time, and the vanilla and cinnamon. Be sure to mix well after each addition to the batter.
Keep in mind the batter will be thick and VERY sticky (this is normal).
Remove the bowl from the mixer and let the dough rest until it doubles in volume inside the bowl.
Gently fold in the pearl sugar and let the dough rest for 15 more minutes.
While the dough is resting, heat the waffle iron
Spoon about a 2" ball of dough into the center of the waffle iron (this should yield a waffle that is about 4" in diameter).
I know that sounds small, but these rich waffles pack quite a punch.
Waffles will take 3 to 5 minutes to bake
Recipe makes 8 - 10 waffles.
*It has been our experience that pearl sugar is difficult to find in the U.S. so buy C&H sugar cubes (normally for coffee), place about 60 of them in a plastic Ziploc bag and 'crush' them with a meat tenderizer (you could use a rolling pin or heavy sauce pan as well). Then put the sugar through a sifter maintaining only the 'pearls' of sugar for the waffles. You need about 1 cup of pearls. The fine sugar that goes through the sifter can be put in your kitchen sugar jar or used to sweeten the strawberries if you are using them for the topping. I was able to find an online source at L'Epicerie or iGourmet. See the pearl sugar photo above so that you know what you are trying to obtain. The addition of pearl sugar in the batter is what gives these waffles that special caramelized Liege waffle taste. However, that same sugar makes them sort of sticky so be careful not to burn yourself when removing them from the waffle iron. The pearl sugar also makes clean-up of the waffle iron tricky. As the sugar melts, it runs in the crevices of the waffle iron. So my biggest tip is that after you finish baking your waffles, clean the waffle iron while it is still warm. If it cools completely, the caramel sugar mixture can be nearly impossible to get off the iron.These waffles freeze extremely well so consider making a double batch.
Storage: Let the waffles cool, wrap them individually in Saran wrap, and then place them in a large Ziploc freezer bag. When we want one, we remove it from the freezer and put it in the oven on a baking sheet to heat it up.
Source
Wednesday, June 9, 2010
My Go To Copic Combos
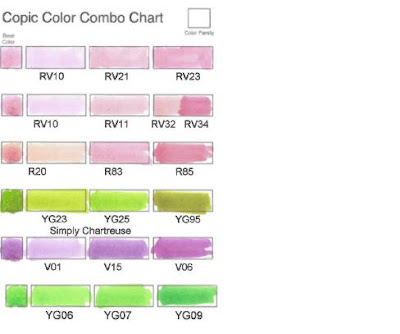
I was trying to pack my bag yesterday so that I could color at work and realized that I just didn't know what colors to throw in the bag... when you have so many choices sometimes narrowing things down can be overwhelming. Since I love to create lists and make charts... I decided a new one was in order. Here is my latest chart- My Go To Copic Combos. (144 of them)
This is based heavily on the recommended colors from the Copic Munkie Blog.
(Where the awesome Copic journal pages live!!!)
*Note -I also tote around some grays so that I can make a dynamic looking black -usually the cools and warms*
This is based heavily on the recommended colors from the Copic Munkie Blog.
(Where the awesome Copic journal pages live!!!)
*Note -I also tote around some grays so that I can make a dynamic looking black -usually the cools and warms*
If you like this type of information, there is also a fabulous post today over at Color Me Copic with the gals' recommended Copic starter colors. Not to be missed. Check it out here.
Tuesday, June 8, 2010
Copic Colour Challenge blog says goodbye
Hi Y'all! I just read that the Copic Colour Challenge blog will not be updating anymore for the time being. That is so sad because I love the color combos they would post every wednesday. Just thought I would post up this chart listing some of my favorite copic colour challenge color combinations from the past. It is currently a blank chart...but some people have expressed an interest in knowing what copic colors compliment each other so I thought I would share.
Maybe the new Color Me Copic blog will fill the void going forward....
If anyone would like it in excel format please email me.
Maybe the new Color Me Copic blog will fill the void going forward....
If anyone would like it in excel format please email me.
Monday, June 7, 2010
Happy Anniversary
I am finally back... I had food poisoning...it was very very very bad! Here is a card I managed to make before I fell ill. I made it for my grandparents 60th wedding anniversary. Since they were married in 1950 I thought the 50's Sweetheart digi from The Greeting Farm was a perfect fit!
Aren't they just too cute!
Recipe: 50's Sweetheart digi from the Greeting Farm, Wine Bottle digi from Becky's Place, PTI sentiment stamp from Enjoy the Ride stamp set, PTI Stampers Select White and Vintage Cream cardstock, Making Memories vintage papers, Zva creative pearl swirl, crotched lace, Tim Holtz Frayed Burlap distress ink, Copics: wine bottle image- C00 C1 C3 BG11 BG72 BG75 G24 G82 YG11 Y00 Y35 YR24 RV34 RV69 E09 0 Uniball Signo White Gel Pen, sweethearts image- E19 E18 E15 E13 E40 E41 R83 RV34 C3 C5 C7 C9 W5 W7 W9 B41 B45 B37
Subscribe to:
Posts (Atom)
Unbounded Beauty Fun Fold and Free Shipping on orders $75+ July 23rd
Today's card is a fabulous fun fold card inspired by Connie Stewart. I used the Unbounded Beauty Suite collection from the new Stampin&...
-
Copic Markers come in 346 colors. That is a lot to choose from and the selection process can be very overwhelming . Let's face it, thes...
-
Just two more days left of Sale-a-bration! I am using my favorite Designer Series Paper - Paper Blooms for this fun Peek-A-Boo Slider card ...
-
I'm Back! I have not been crafting for a while now. Managing my IBS has kept me pretty busy for months. I am happy to report I am doi...